More often than not, blog owners who are working independently and may not know advanced SEO (Search Engine Optimization) techniques will try new things with their blogs which could end up hurting their rankings and it can get confusing.
Last night I decided to make some much-needed changes to ‘The Wpromoter Blog’ to help increase our rankings in the search engines. As we’ve been diligently writing blog posts and doing our best to keep the world informed, we’ve accumulated a rather large number of posts while the blog has been enjoyed by our readers.
When the blog was added to our site, it was done after our website was created programmatically. The blog is a WordPress installation in a subdirectory called /blog.
Before I Begin Explaining What I’ve Done, Here Is An Example Scenario:
Joe Blogger Dude has a blog running on his own installation of WordPress called joeblogger.com -now this isn’t a real blog and if you go there you will see this: 
For our example, his URLs currently display in this format:
http://www.joeblogger.com/%year%/%month%/%day%/%postname%/
i.e. Live it could look something like this:
http://www.joeblogger.com/2008/08/01/how-to-joe-blog/
After Joe visited an event somewhere such as SMX he found some information about blog SEO that influenced him to use a custom blog structure in WordPress for his URLs instead of the longer default one with all the date stamps in the URL – which are really only useful for news posts that you want indexed in Yahoo’s News section or other news sites which require the date to be in the URL to be indexed (but that’s a whole other post to write about).
Joe had the default setup when he started by simply following the installation instructions for WordPress that don’t include any information about SEO techniques for blog optimization.
Here’s The Problem
Now Joe has the ammunition of wanting to change his permalink structure somehow, so he Google’s ‘How do I change my Permalink Structure in WordPress?’
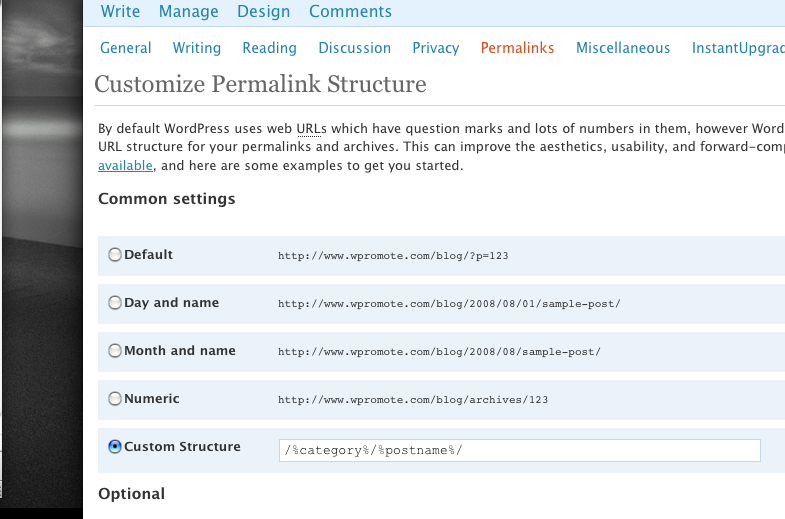
After some quick research he finds out that the way to do it is in the ‘wp-admin’ area where you choose ‘Settings – > Permalink’ and choose the radio button for ‘Custom’ and then enter the following string in:
/%category%/%postname%/
This will now replace the dates in the URL after the domain name with the category of the post in EACH post and then the post-slug (postname).
So, Joe sets it up and everything works great, now his posts have much cleaner URLs. He’s very happy.
The ‘problem’ I mentioned is right here: He doesn’t realize that any of his posts that were ranking in Google will now return a 404 error and eventually drop from the SERPs (Search Engine Results Pages).
So What Do You Do To KEEP Your Rankings?
The answer most SEOs will tell you is to 301 redirect all your old blog posts to the new ones.
Great.
Guess what? Joe Blogger had 250 blog posts.
WHAT a laborious task this has now become.
 To manually create all those 301s is a real pain in the ass. You need some programmatic or software or quick and dirty solution to do this much faster.
There are plugins and ways to achieve the results, just use your brain a bit to figure it out.
My next example is what I did to solve this issue for ‘The Wpromoter blog’ that you are reading now. Our posts used to look like this:
https://www.wpromote.com/blog/2008/07/31/information-age-overload/
Now they look like this:
https://www.wpromote.com/blog/internet-news/information-age-overload/
TRY CLICKING ON THE /2008/07/31 POST & SEE THE 301 IN ACTION!
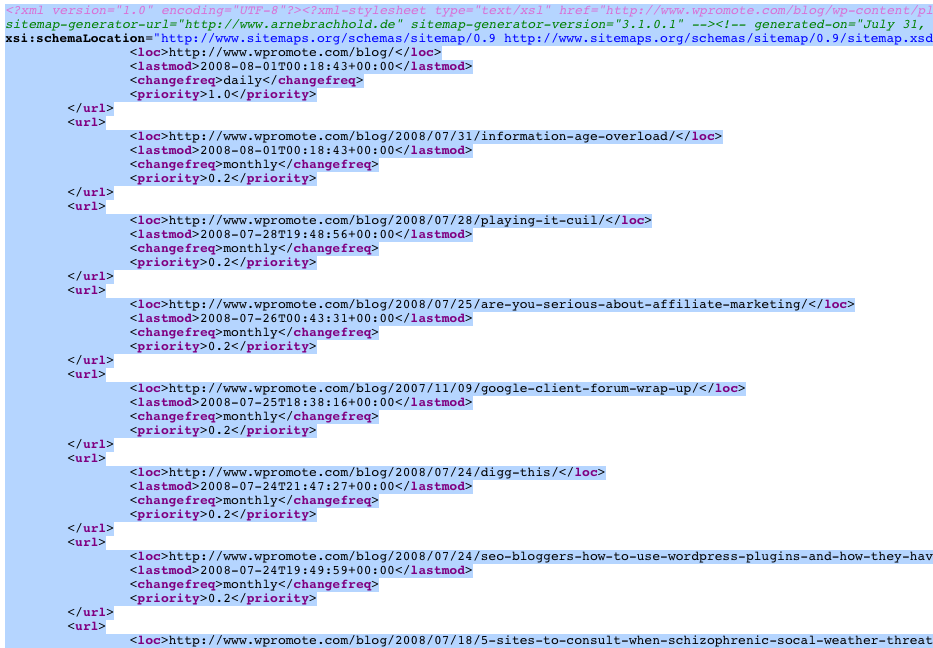
Step 1. Install the XML Sitemap Generator Plugin in Your WordPress Blog
– (note: if you use other blog software, all of these principles will be the same, you may have to find another way to generate the URLs, or just use an online sitemap generator)
Steph 2. Generate a Sitemap File For the Blog & View the Sitemap It Creates
Save the sitemap locally on your computer as ‘old-sitemap.xml’.
Step 3. Open The File In an Editor (i.e. TextEdit, Notepad, Smultron, Dreamweaver)
Use various find and replace techniques to strip out just the URLs for each post.
i.e. search for: </url><url> ignoring whitespace, then <loc>, then </loc> replacing them all with an empty character to remove them. – Simply end up with a list of URLs.
Step 4. Temporarily Block The Search Engines From Indexing Your Blog While You Make The Changes
Step 5. Setup The Custom Permalink Structure in WordPress
In WordPress, go to:
‘Settings – > Permalink’ and choose the radio button for ‘Custom’ and then enter the following string in:
/%category%/%postname%/
Now you will see right away that your post URLs look much cleaner. Check to make sure that this works by looking at your blog and going through several pages to make sure it worked.
i.e. they now look like this.
https://www.wpromote.com/blog/technology/information-age-overload/
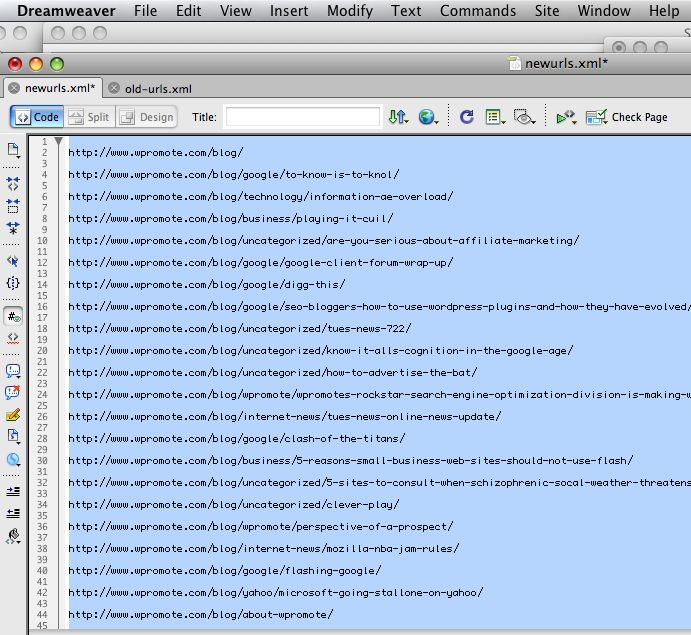
Step 6. Generate Another Sitemap For the ‘New’ URL Structure
Follow the same steps as above in step 2.
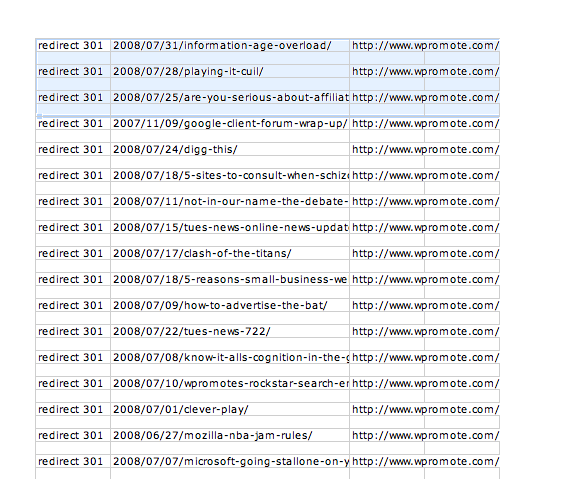
Step 7. Cut & Paste the Two Files Into Excel in Different Columns
i.e. column A will read: Redirect 301, column B will be the OLD URLS, column C will be the NEW URLS.
Step 8. Cut & Paste From Excel Into Your Text Editor
Save the file as UTF-8 encoding.
This will be either added to your current .htaccess file (if there’s anything already in the file, leave one blank line and paste these redirects) or create a new one. Note on MACs you’ll have to name the file htaccess.txt or something readable, just rename it .htaccess after you have uploaded it to the root of the blog directory – i.e. in our case /blog
Step 9. WAIT If You Have a Sitemap Already With the ‘Old URLs’ Until Google Crawls It
You need to allow google some time to crawl and index the 301s. IMPORTANT NOTE: You will know that this has occured when searches on posts that were indexed in the old URLs start showing up as the new URLs.
One way to speed up the process is to submit an XML sitemap (via Webmaster Tools) to Google that contains the old URLs. Then, WAIT until everything has been crawled.
Step 10. Enable Search Engines to Crawl Your Site Again
Now come back to the Privacy Settings page and Click the top radio button allowing the blog to be indexed by the Search Engines again.
Step 11. Submit NEW URLs in the Sitemap After They Have Been Crawled
Once none of the older pages are showing up for searches on blog content from the posts, you will want to update your XML sitemap with ONLY the NEW URLs.
Step 12. Be Aware of Duplicate Content Issues
To ensure that none of the archive posts get dinged by Google as ‘duplicate content’, I activated the ‘Duplicate Content Cure’ plugin in WordPress which adds the Meta ‘NOINDEX’ tag to all the archive pages that contain the same content as the blog posts, but have a different URL. This tells the search engines not to index any of the archive pages(with less human friendly URLs) and ensures only posts in the proper format get indexed.
Step 13. Sit Back & Wait For the New Rankings to Start Rolling In!
Till next time,
Your Friendly Neighborhood SEO


Responses